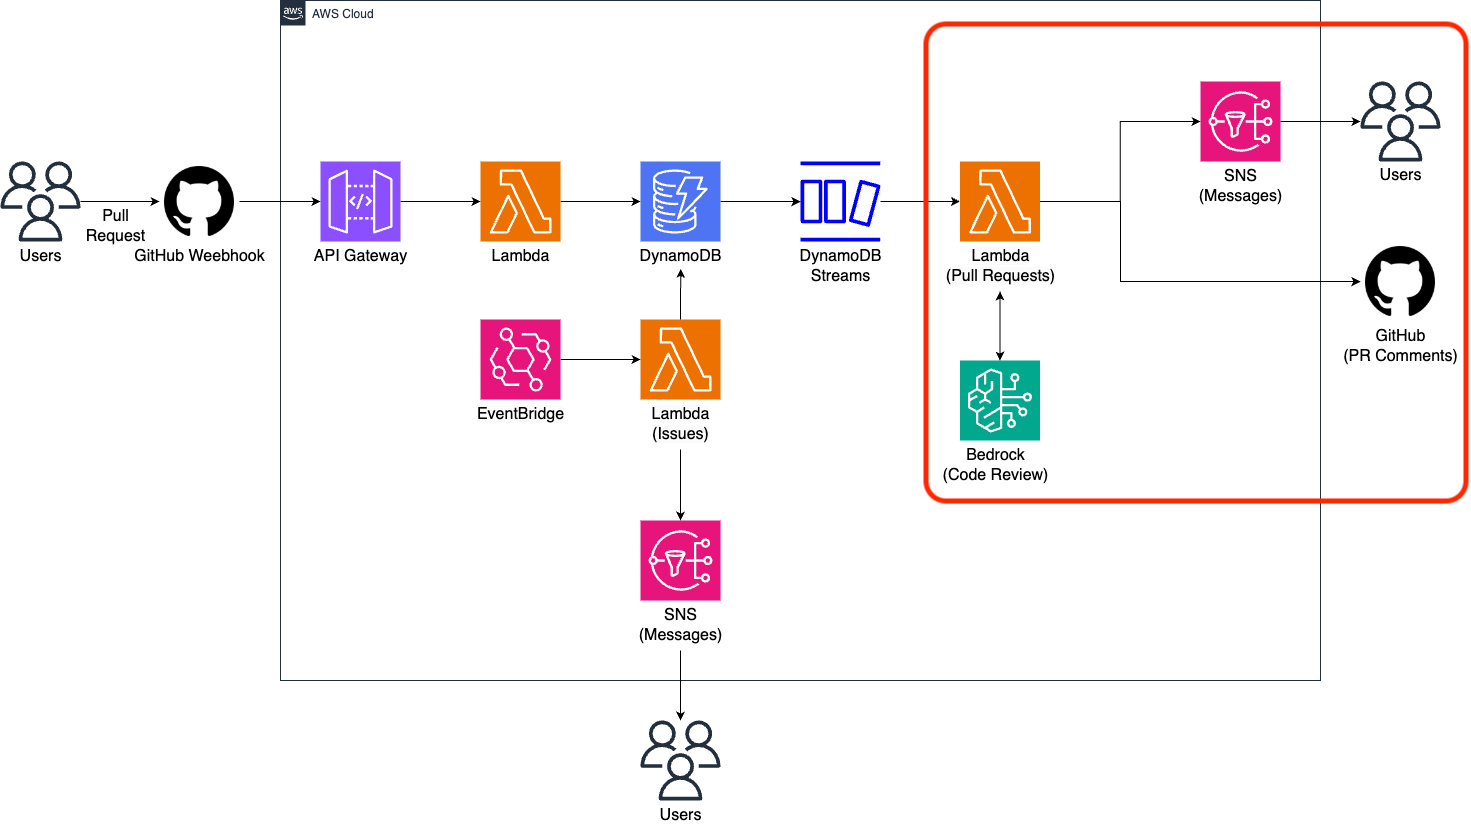
3️⃣ Bedrock을 활용해 PR에 대한 자동 코드 리뷰 작성하기
✅ 실습 전 us-west-2 리전이 맞는지 확인해주세요!
Access Bedrock Model
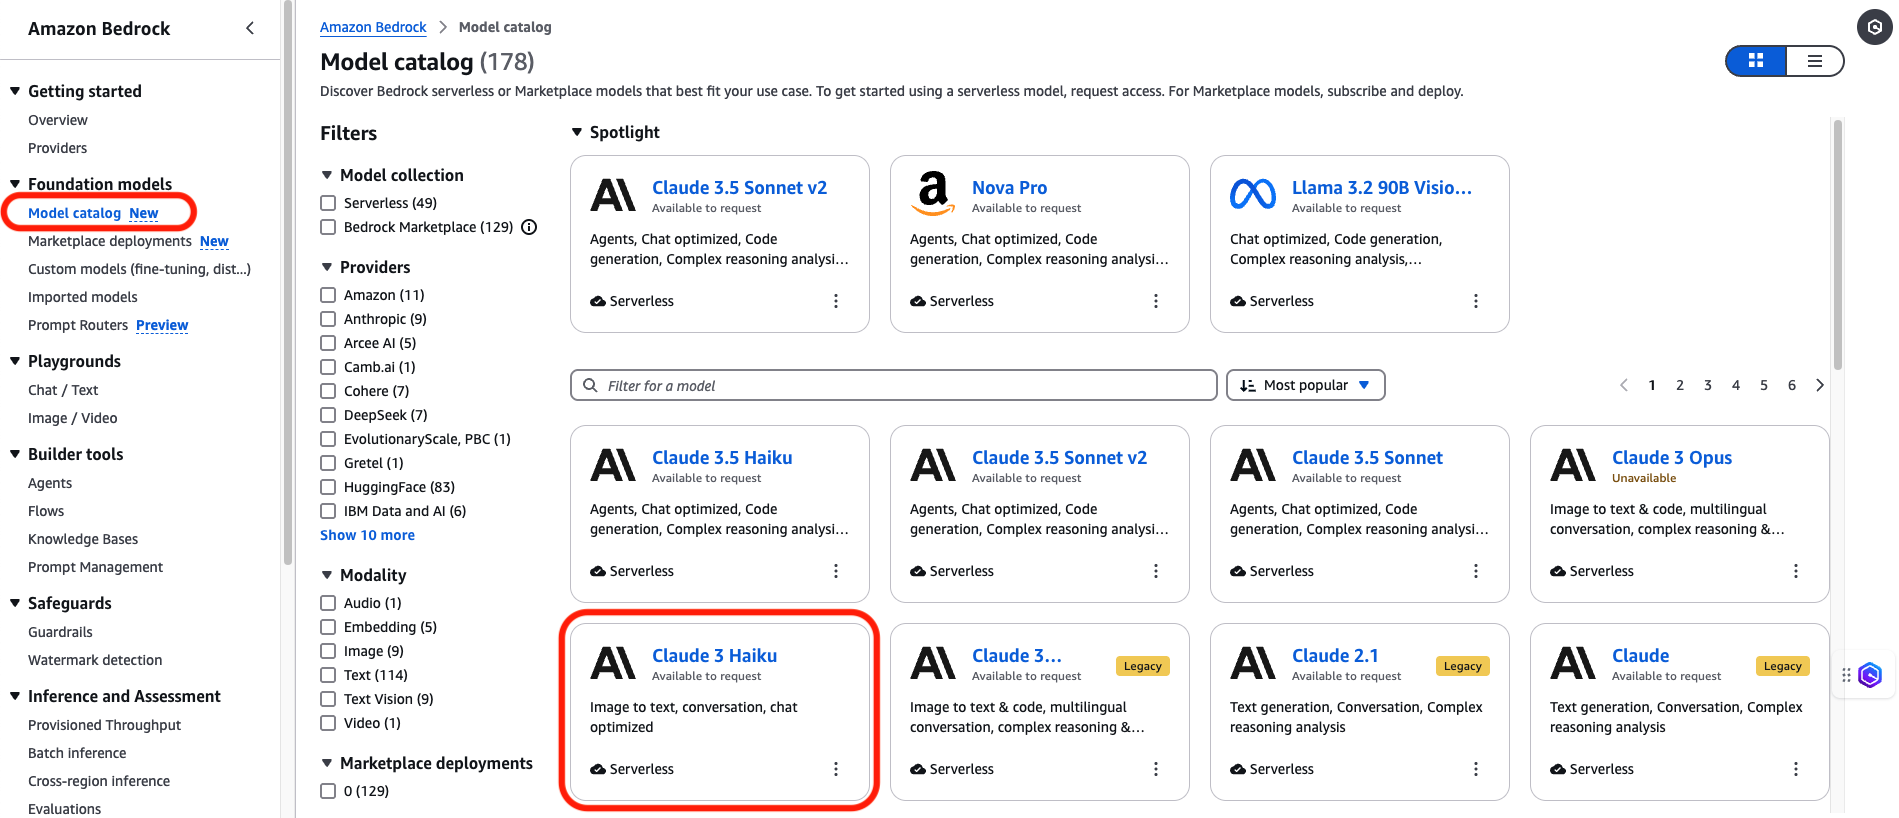
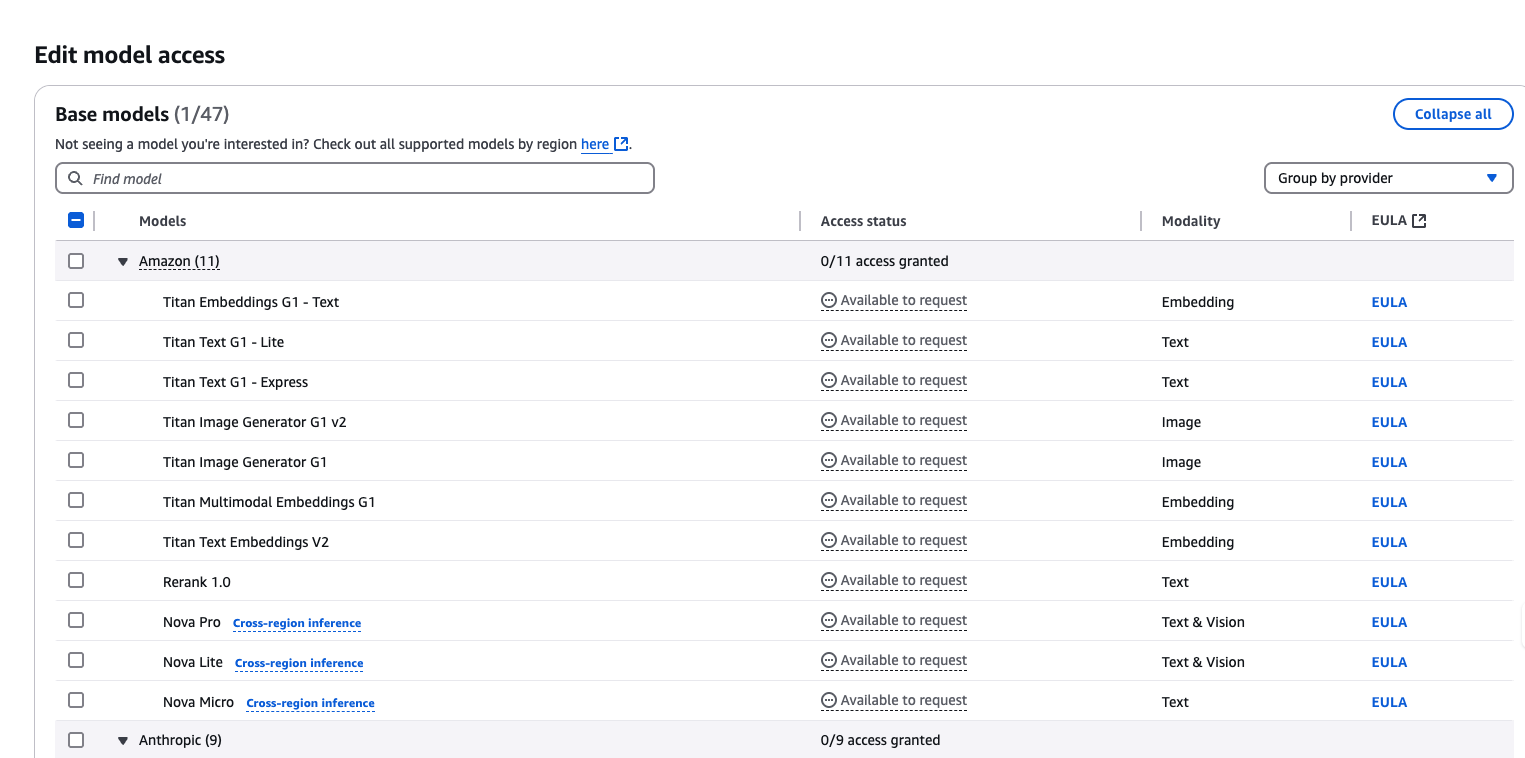
코드리뷰를 하기 위해서는 Bedrock에서 model의 access를 요청해야 합니다. 각 모델은 API 할당량이 있기에, 이번 실습에서는 가장 많이 사용할 수 있는 모델인 Claude 3 Haiku를 사용합니다.
아래의 이미지처럼 회색으로 쓰여진 Available to request 부분에 마우스를 갖다 대면 Request model access를 클릭할 수 있습니다.

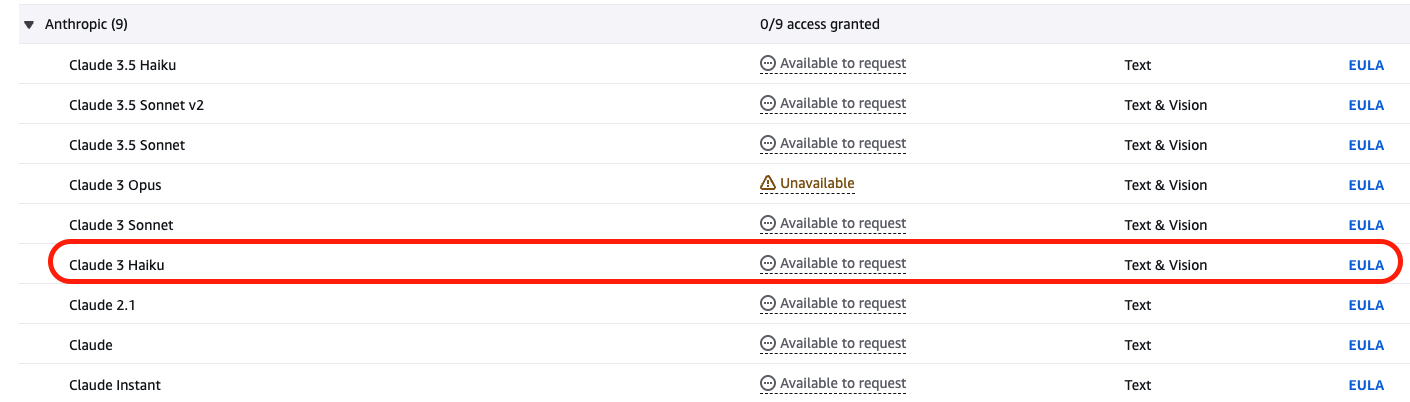
클릭 후 다음 페이지로 넘어가서 하단으로 내려가면 아래와 같이 Anthropic의 Claude 모델들이 있는 것을 확인할 수 있습니다. 그중 저희는 Claude 3 Haiku 줄에 Available to request를 클릭 후 Request model access를 클릭합니다.
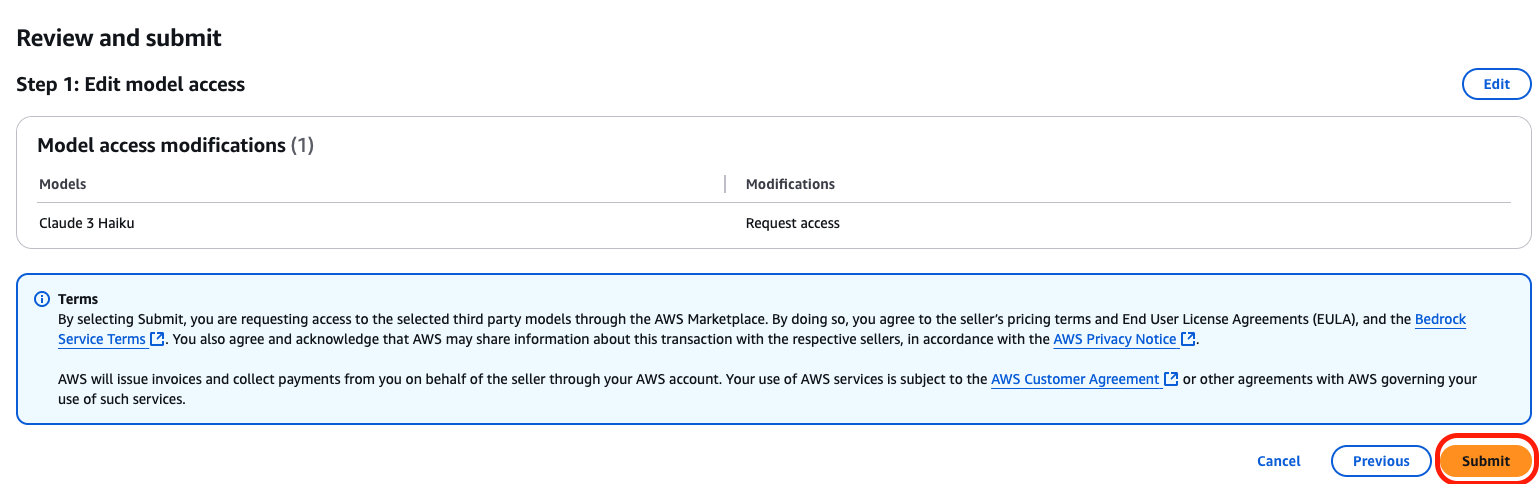
자동으로 다음 페이지인 Edit model access로 들어가게 될 것입니다. 당황하지 말고 아래로 스크롤 한 후 Next 버튼을 눌러주시면 됩니다.

다음 페이지인 Review and submit 페이지로 넘어가면 Claude 3 Haiku를 선택하셨는지 다시 검토 후 Submit 버튼을 클릭합니다.
약간의 시간이 지나면 In Progress에서 Access granted가 되는 것을 확인할 수 있습니다.
![]()
![]()
Phone number 등록
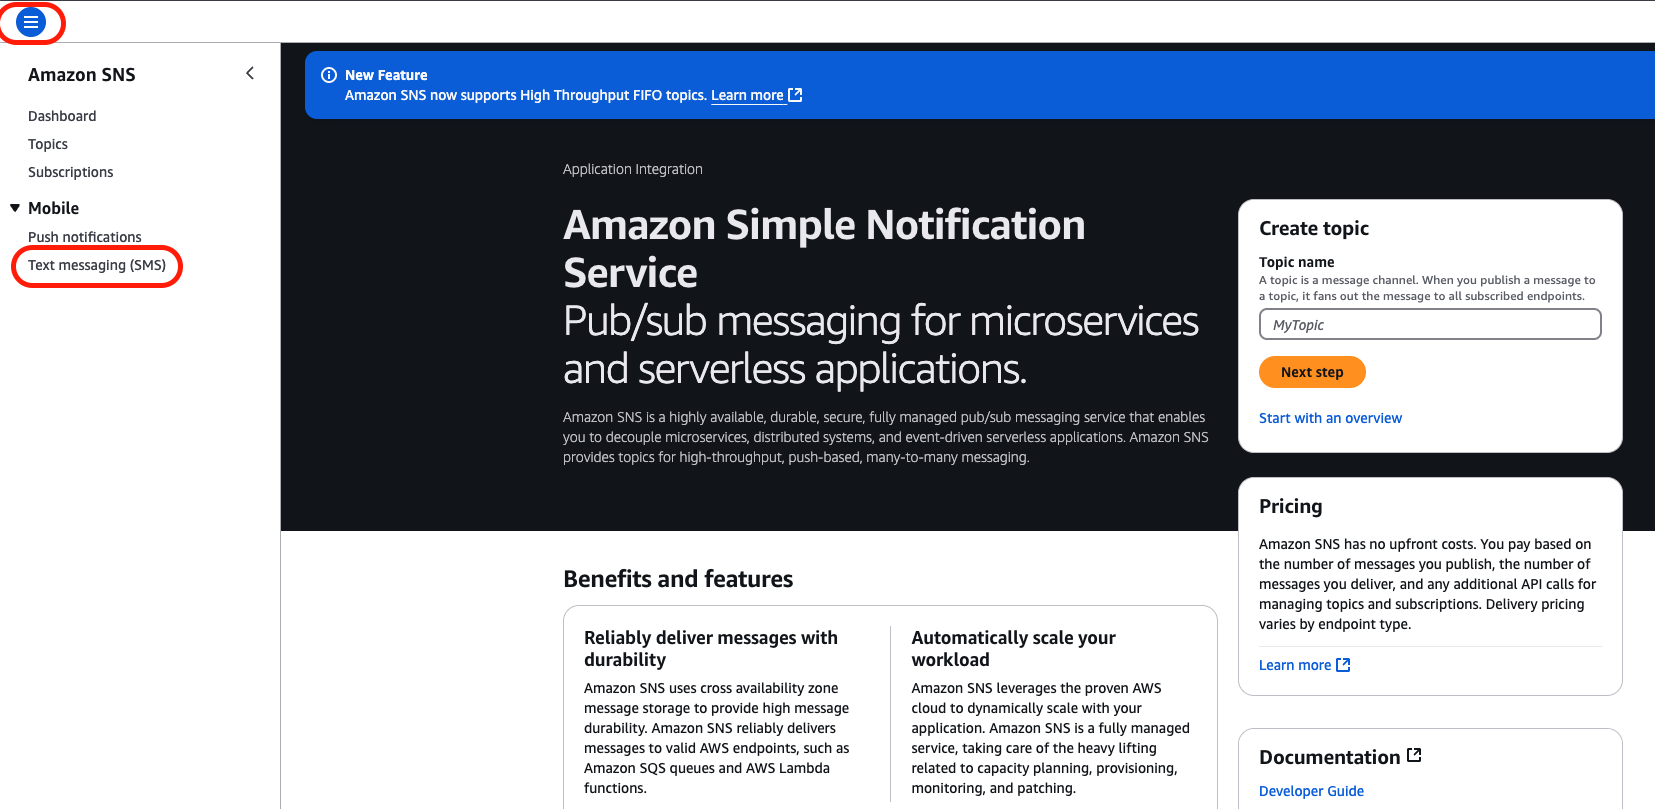
다음으로 검색 창에 SNS를 검색하여 들어갑니다. 왼쪽 상단의 사이드바 기호를 클릭하고 Text messaging(SMS)를 클릭합니다.
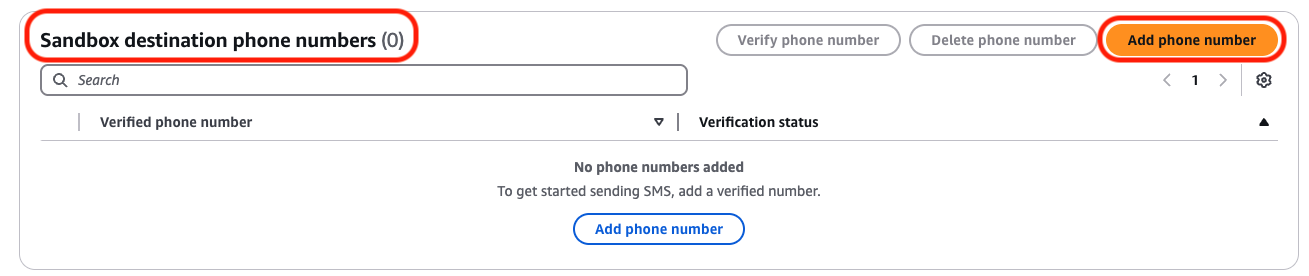
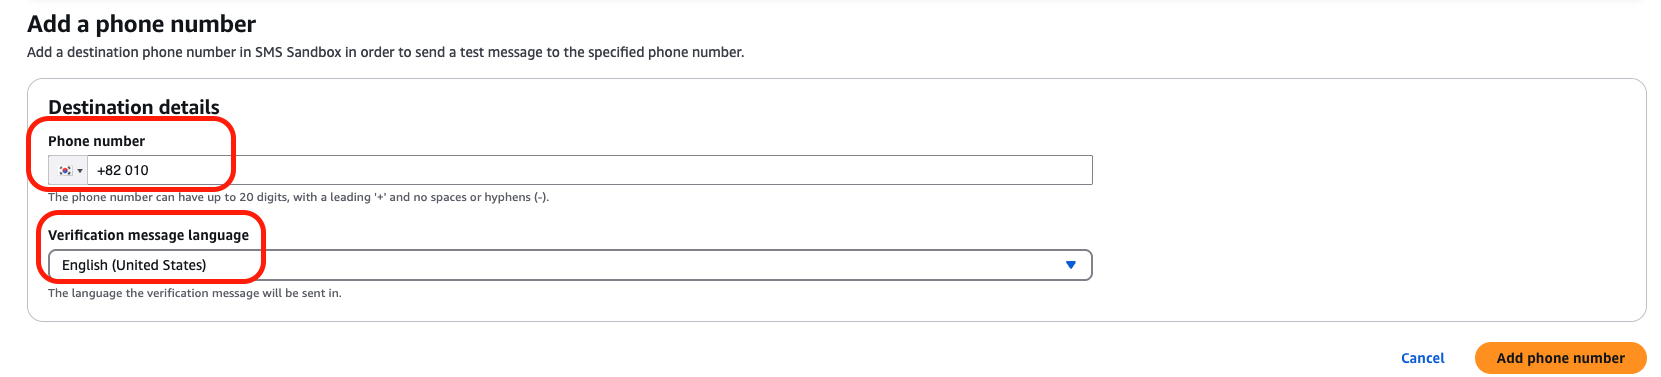
하단으로 내려가면 Sandbox destination phone numbers라는 곳에 Add phone number를 할 수 있습니다. 문자 받을 번호를 적는 곳입니다. Add phone number를 클릭합니다.
'+82010xxxxxxxx' 형태로 번호를 적은 후 Verification message language는 'English (United States)'를 선택 후 Add phone number를 클릭합니다.
받은 Verification code를 입력하고 Verify phone number를 클릭합니다.
다시 하단으로 내려가면 Verification status가 Verified된 것을 확인할 수 있습니다.

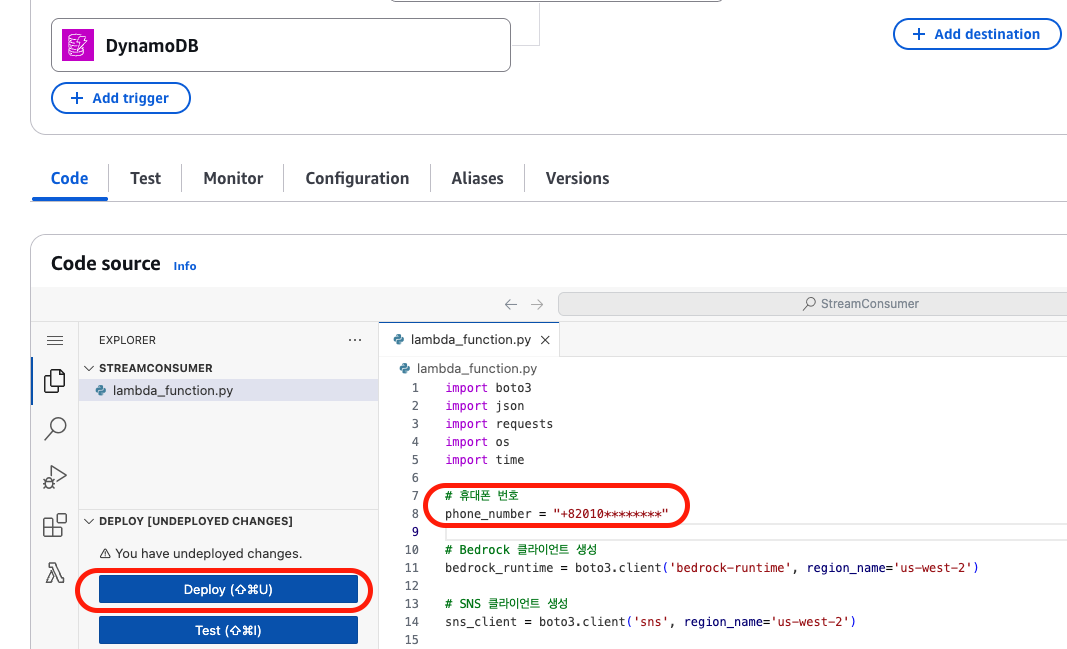
이제 다시 StreamConsumer 람다로 돌아가서 아래의 코드를 코드 창에 붙여 넣고 아까 SNS에 등록한 휴대폰 번호를 코드에 넣습니다. 다음으로 Deploy 버튼을 누릅니다.
import boto3
import json
import requests
import os
import time
# 휴대폰 번호
phone_number = "+82010********"
# Bedrock 클라이언트 생성
bedrock_runtime = boto3.client('bedrock-runtime', region_name='us-west-2')
# SNS 클라이언트 생성
sns_client = boto3.client('sns', region_name='us-west-2')
# GitHub API 요청을 위한 헤더
GITHUB_TOKEN = os.environ['GITHUB_TOKEN']
HEADERS = {
"Authorization": f"token {GITHUB_TOKEN}",
"Accept": "application/vnd.github.v3+json",
}
def generate_code_review(code_diff):
prompt = (
f"Human: You are a senior software engineer performing a code review. "
f"Please analyze the following code changes and provide a detailed review. "
f"Please write it in Korean."
f"Focus on these aspects:\n"
f"- Code readability (e.g., naming, comments)\n"
f"- Performance (e.g., time/space complexity)\n"
f"- Security (e.g., sensitive data exposure)\n"
f"- Best practices (e.g., Python PEP8, AWS security best practices)\n"
f"- Improvement suggestions with example code if applicable.\n\n"
f"Code changes:\n{code_diff}\n\nAssistant:"
)
request = json.dumps({
"anthropic_version": "bedrock-2023-05-31",
"max_tokens": 4000,
"temperature": 0.3,
"top_k": 250,
"top_p": 0.999,
"messages": [{"role": "user", "content": [{"type": "text", "text": prompt}]}],
})
try:
response = bedrock_runtime.invoke_model(
modelId="anthropic.claude-3-haiku-20240307-v1:0",
body=request,
)
raw_body = response['body'].read().decode("utf-8")
return json.loads(raw_body).get('content', [{}])[0].get('text', "Code review failed.")
except Exception as e:
print("Error invoking Bedrock:", e)
return "Code review generation failed."
def post_github_pr_comment(repo, pr_number, review_text):
url = f"https://api.github.com/repos/{repo}/issues/{pr_number}/comments"
payload = {"body": review_text}
response = requests.post(url, headers=HEADERS, json=payload)
if response.status_code == 201:
print(f"GitHub PR 코드 리뷰 작성 완료.")
else:
print(f"PR 코드 리뷰 작성 실패: {response.status_code}")
print(response.json())
def send_sns_notification(message):
try:
response = sns_client.publish(
PhoneNumber=phone_number,
Message=message
)
print(f"SNS 알림 전송 완료: {response}")
except Exception as e:
print(f"SNS 알림 전송 실패: {e}")
def process_pull_request(payload):
repository = payload['repository']['full_name']
pr_number = payload['pull_request']['number']
pr_title = payload['pull_request']['title']
pr_url = payload['pull_request']['html_url']
sender = payload['pull_request']['user']['login']
action = payload['action']
diff_url = payload['pull_request']['diff_url']
if action != "opened":
print(f"PR 이벤트 {action}은 코드 리뷰를 수행하지 않습니다.")
return {"statusCode": 200, "body": f"Skipped code review for PR action: {action}"}
diff_response = requests.get(diff_url)
code_diff = diff_response.text
review_text = generate_code_review(code_diff)
post_github_pr_comment(repository, pr_number, review_text)
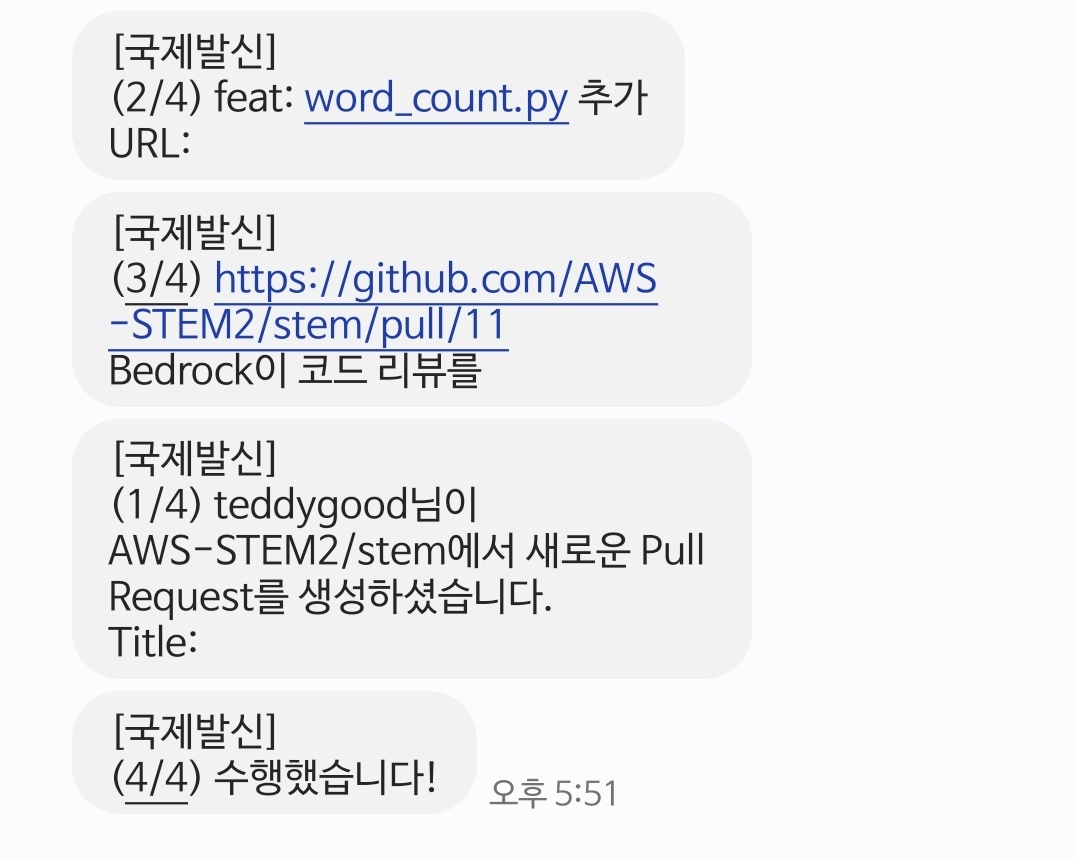
message = f"{sender}님이 {repository}에서 새로운 Pull Request를 생성하셨습니다.\nTitle: {pr_title}\nURL: {pr_url}\nBedrock이 코드 리뷰를 수행했습니다!"
send_sns_notification(message)
return {"statusCode": 200, "body": f"SNS notification sent for PR: {pr_title}"}
def lambda_handler(event, context):
print("Received DynamoDB Stream event.")
for record in event['Records']:
event_name = record['eventName']
if event_name not in ("INSERT", "MODIFY"):
print(f"Skipping event: {event_name}")
continue
new_image = record['dynamodb'].get('NewImage', {})
event_type = new_image.get('event_type', {}).get('S', None)
item_id = new_image.get('id', {}).get('S', None)
if not item_id:
print("Missing item ID, skipping.")
continue
if event_type == "pull_request":
repository = new_image['repository']['S']
pr_number = int(new_image['number']['N'])
pr_title = new_image['title']['S']
pr_url = new_image['url']['S']
sender = new_image['sender']['S']
action = new_image['action']['S']
diff_url = new_image['diff_url']['S']
dummy_payload = {
"repository": {"full_name": repository},
"pull_request": {
"number": pr_number,
"title": pr_title,
"html_url": pr_url,
"user": {"login": sender},
"diff_url": diff_url
},
"action": action
}
process_pull_request(dummy_payload)
else:
print(f"Unknown or unsupported event_type: {event_type}")
return {"statusCode": 200, "body": "DynamoDB Stream processing complete"}
layer 추가
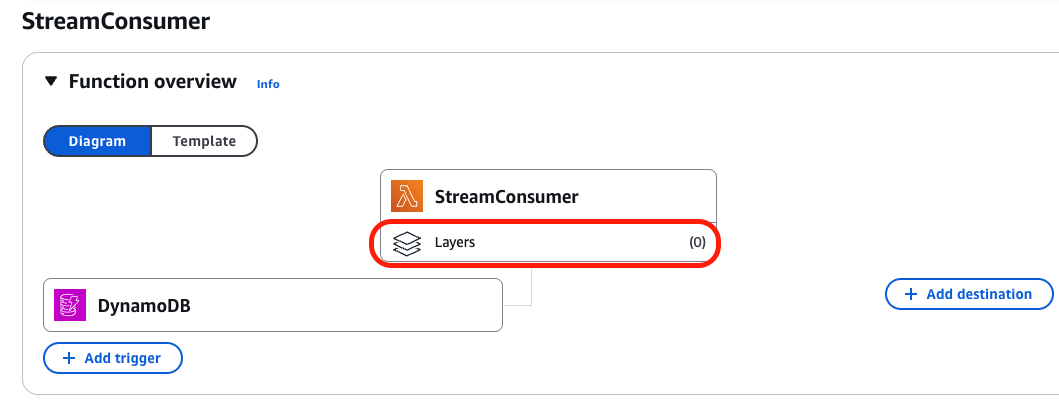
현재 코드에는 requests라는 라이브러리가 추가되어 있습니다. 람다에는 reqeusts 라이브러리는 실행시키지 못 하기 때문에 직접 라이브러리를 넣어줘야 합니다. 라이브러리는 람다의 Layers라는 기능을 사용하여 넣을 수 있습니다. Layers 버튼을 눌러줍니다.
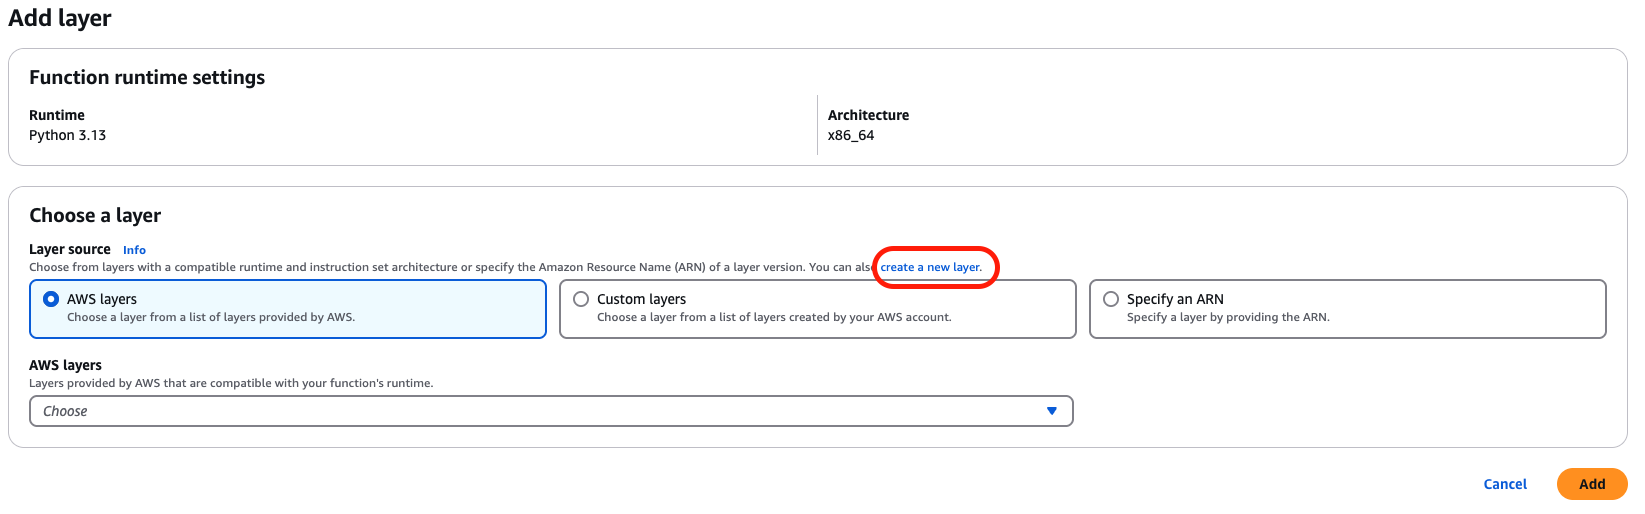
가장 하단으로 내려갈텐데 Layers 부분에서 Add a layer 버튼을 클릭합니다.

아래와 같은 페이지로 넘어간 후 파란 글씨로 작게 적혀 있는 create a new layer를 클릭합니다.
🚩 아래 링크를 클릭하여 라이브러리 파일을 다운로드합니다.
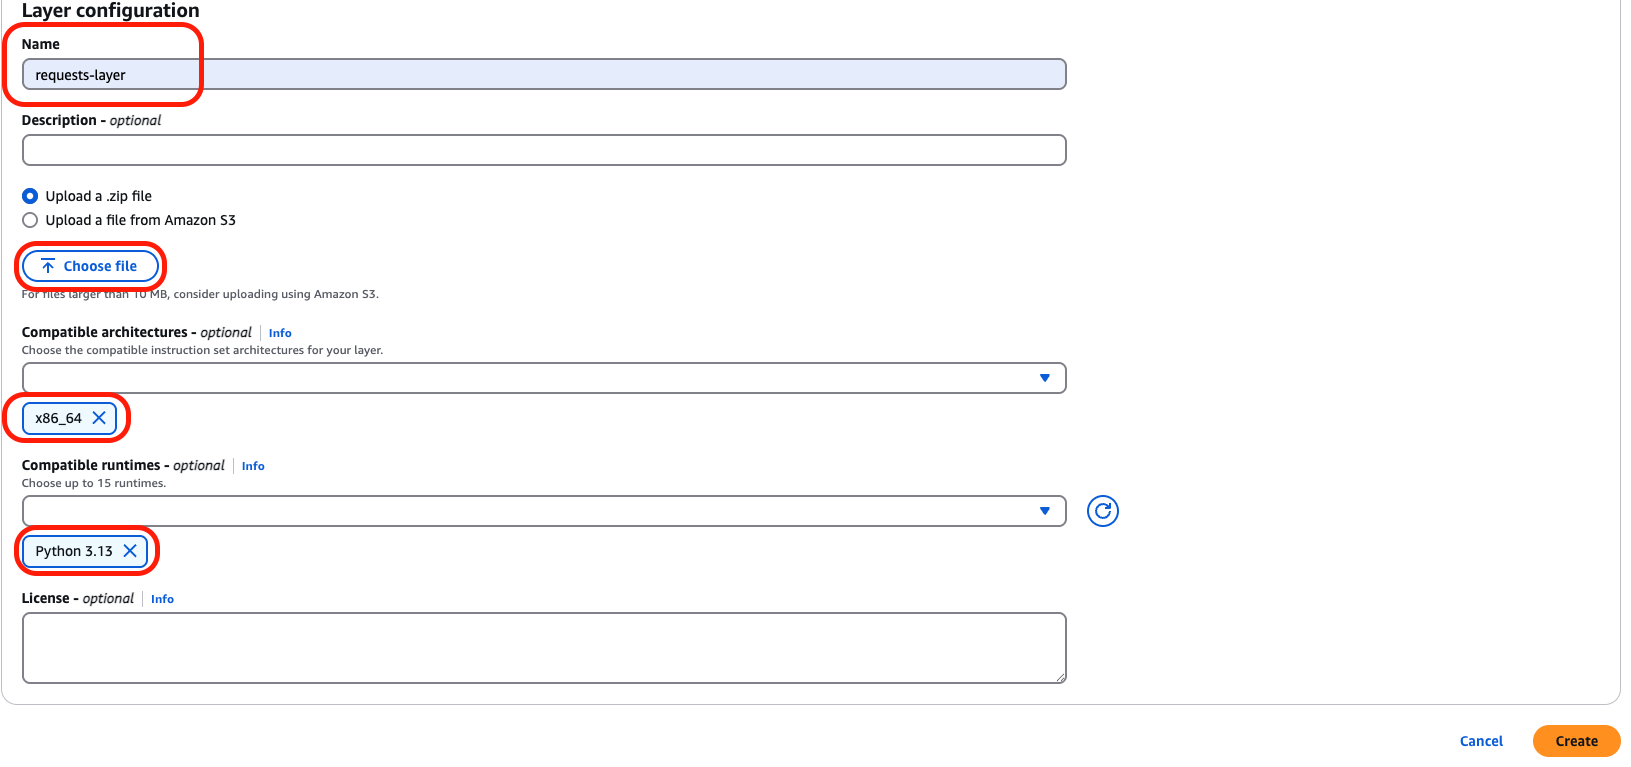
아래의 이미지처럼 값을 기입하고 Choose file을 클릭하여 다운로드한 zip 파일을 넣은 후 오른쪽 하단의 Create 버튼을 클릭합니다.
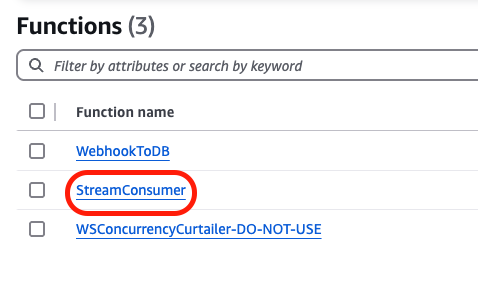
아래와 같은 화면으로 넘어갈텐데 당황하지 말고 사이드바를 열어 Functions를 클릭합니다.

StreamConsumer를 눌러줍니다.
다시 Layers를 누르고 Add a layer를 클릭합니다.
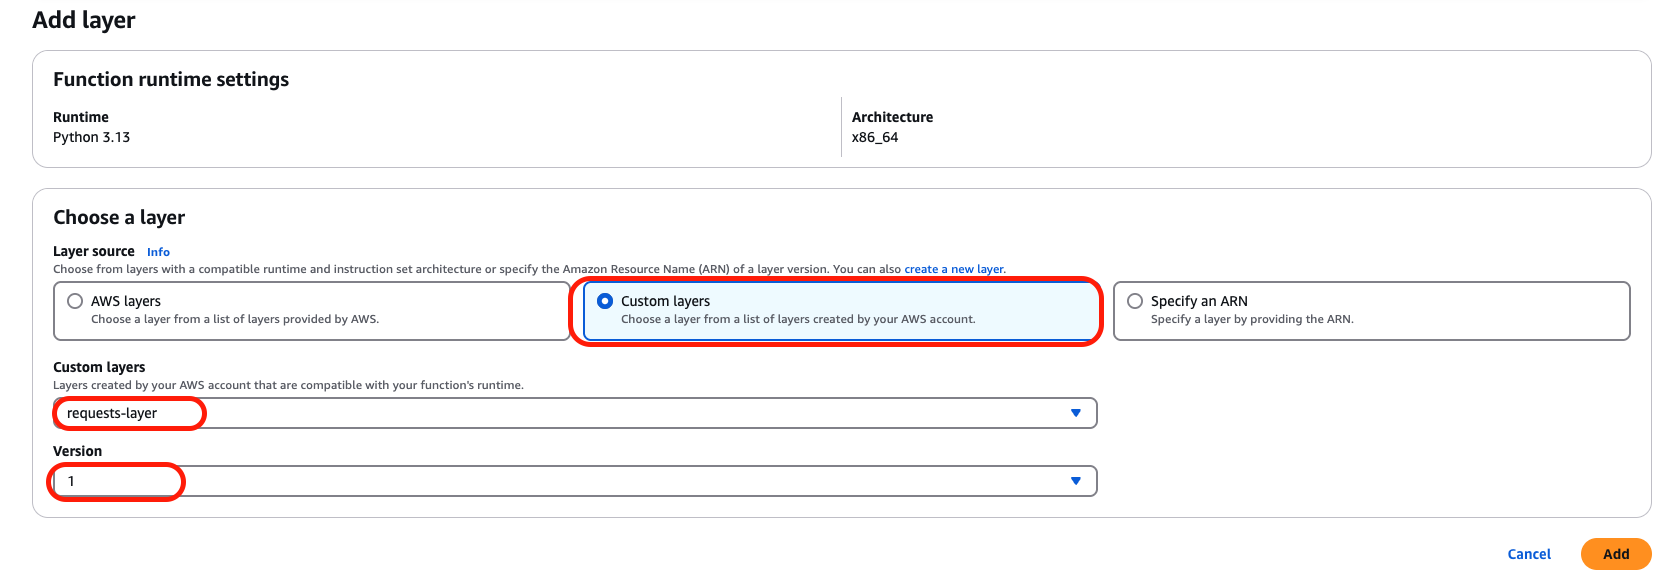
Custom layers를 선택 후 방금 만든 layer를 아래와 같이 선택하고 Add 버튼을 누릅니다.
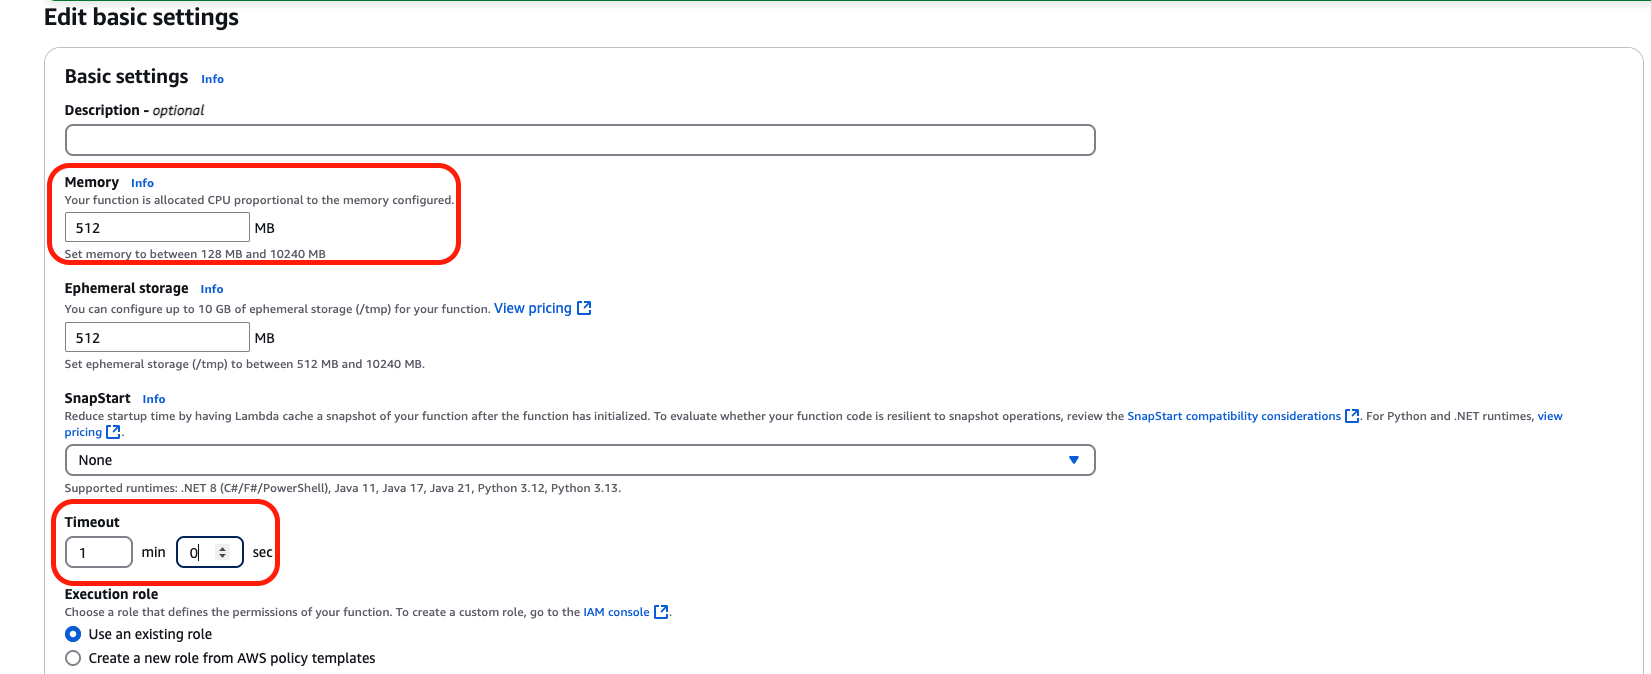
다음으로 원활하게 람다 함수를 사용하고 싶다면 메모리와 Timeout을 늘려야 합니다.
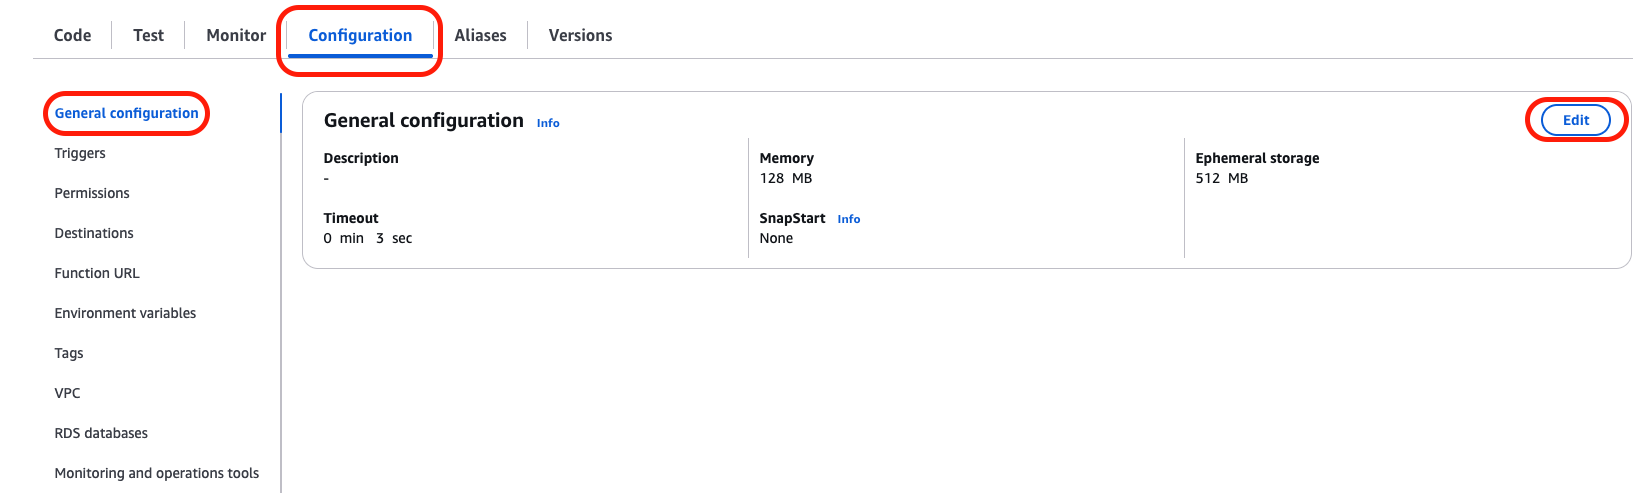
아래와 같이 512 MB, 1 min으로 변경 후 오른쪽 하단의 Save 버튼을 누릅니다.
토큰 발급 및 코드 리뷰 테스트
GitHub에 Pull Request에 comment를 작성하게 하려면 GitHub API를 사용해야 합니다. 그러기 위해서는 GitHub Token이 필요합니다. 다음 사이트에 들어가 GitHub Token을 발급 받습니다.
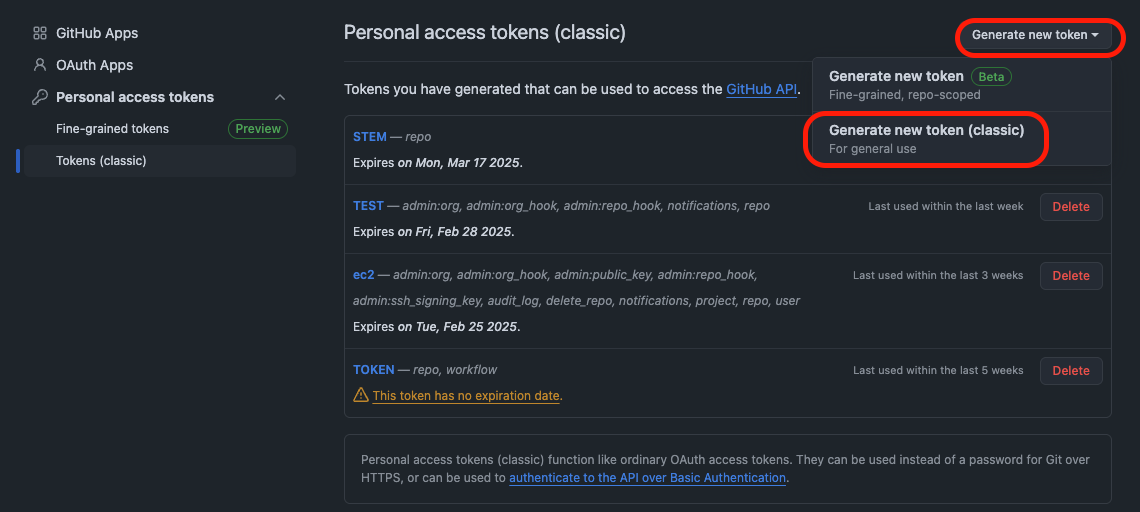
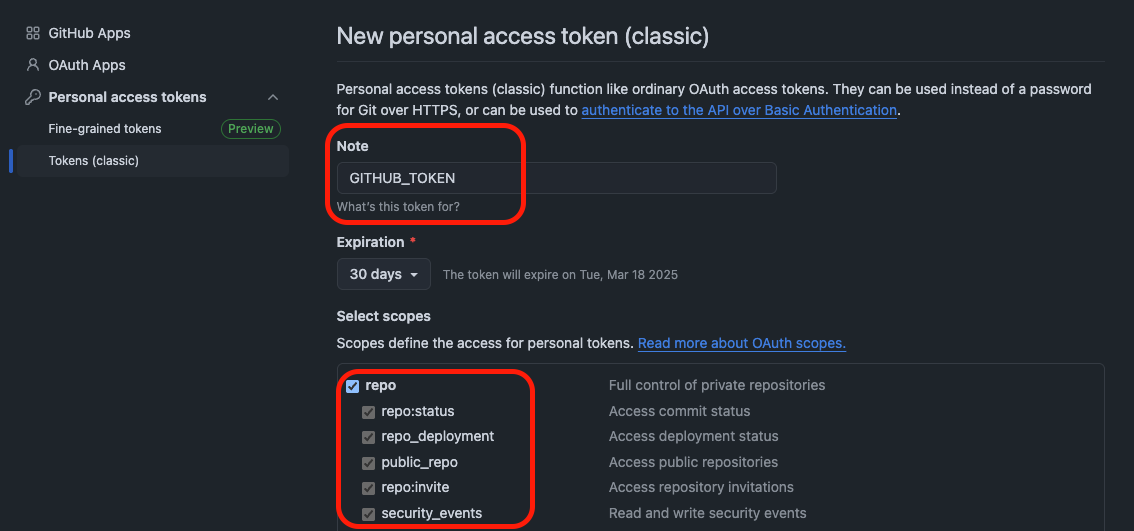
많은 옵션이 있지만 이번 실습에서는 repository에 들어가서 pull request에 comment를 작성하는 것이 목표이기에 repo 권한만 선택합니다. 그리고 하단으로 내려가서 Generate 버튼을 클릭합니다.
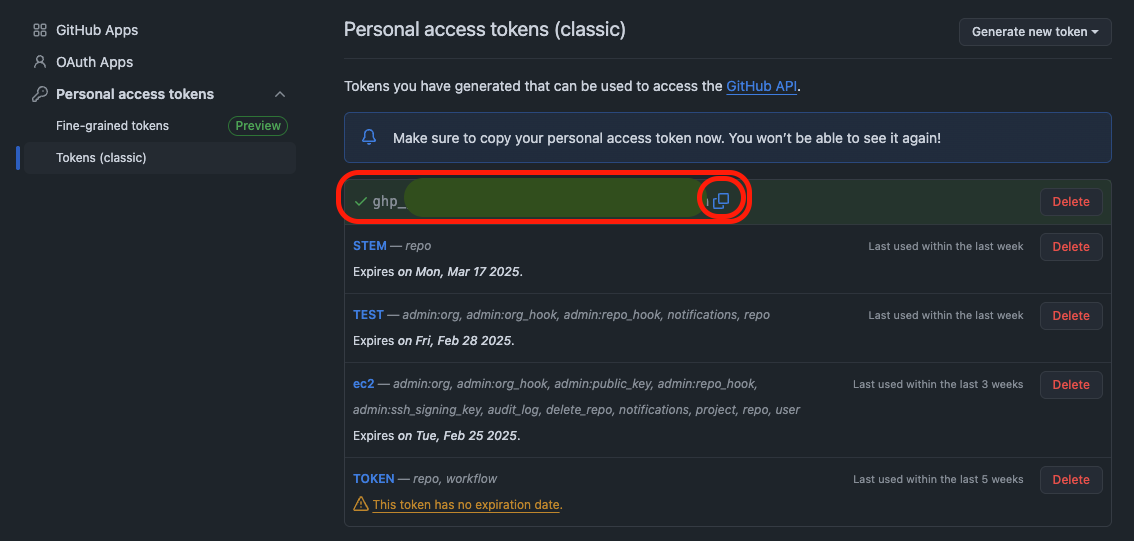
아래와 같은 화면으로 넘어가면 GitHub Token이 생성된 것입니다. 복사 기호를 클릭합니다.
다시 람다로 돌아가서 Token을 등록합니다. Configuration -> Environment variables를 클릭 후 Edit 버튼을 누릅니다.
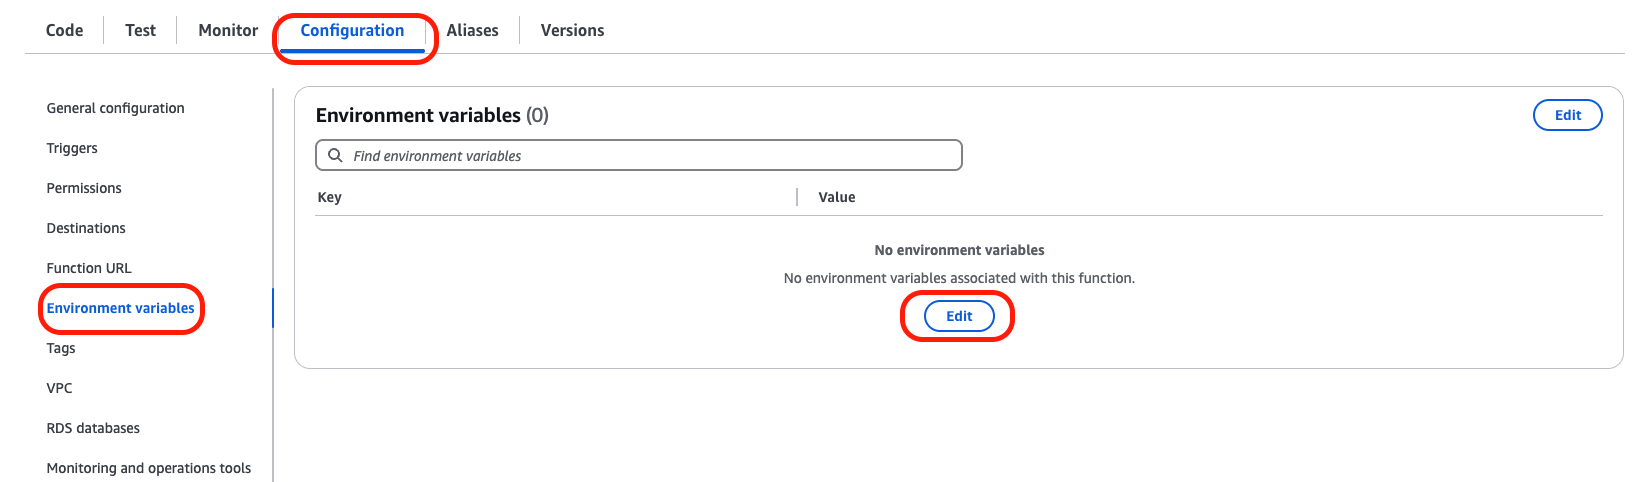
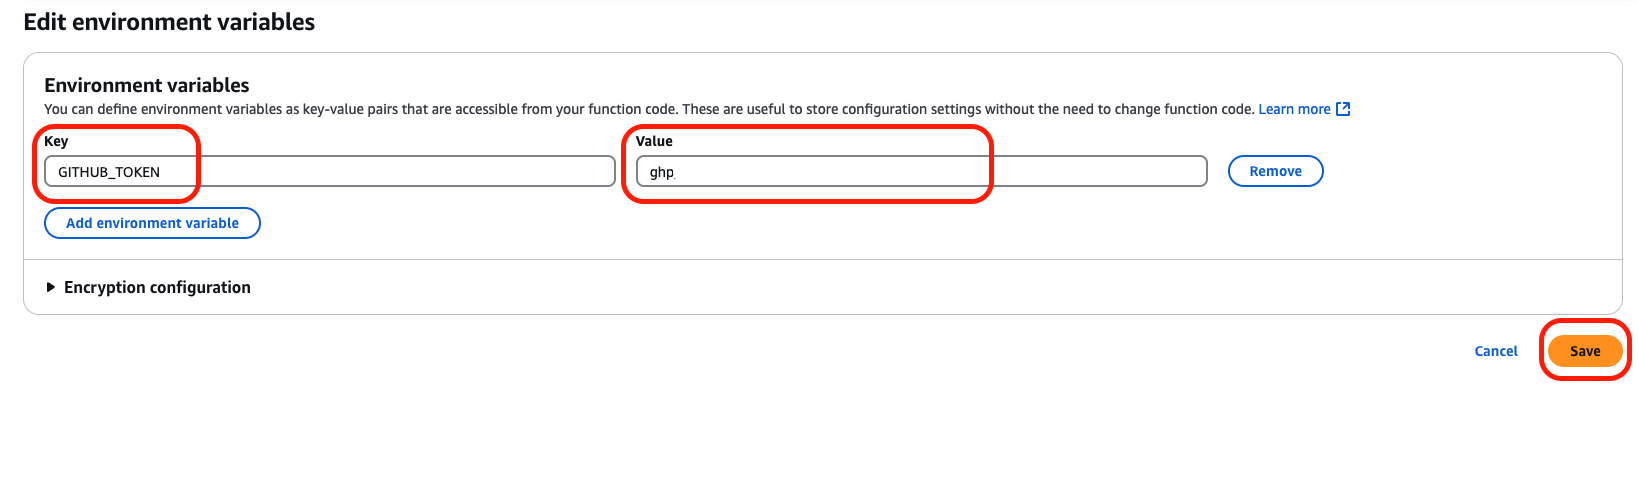
Key 값은 'GITHUB_TOKEN'으로 설정하고 복사했던 Token을 Value에 넣어준 후 Save를 눌러줍니다.
이후 GitHub에서 코드를 commit 한 후 Pull request를 작성하면 Bedrock이 리뷰를 해주는 것을 확인할 수 있습니다.
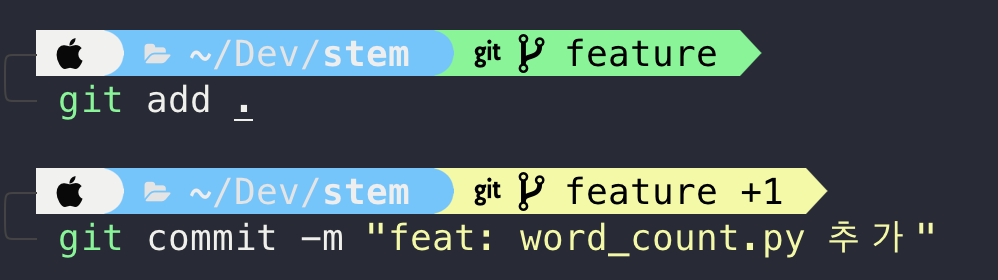
미리 만들어둔 레포를 clone 후 브랜치를 만듭니다.
git checkout -b feature

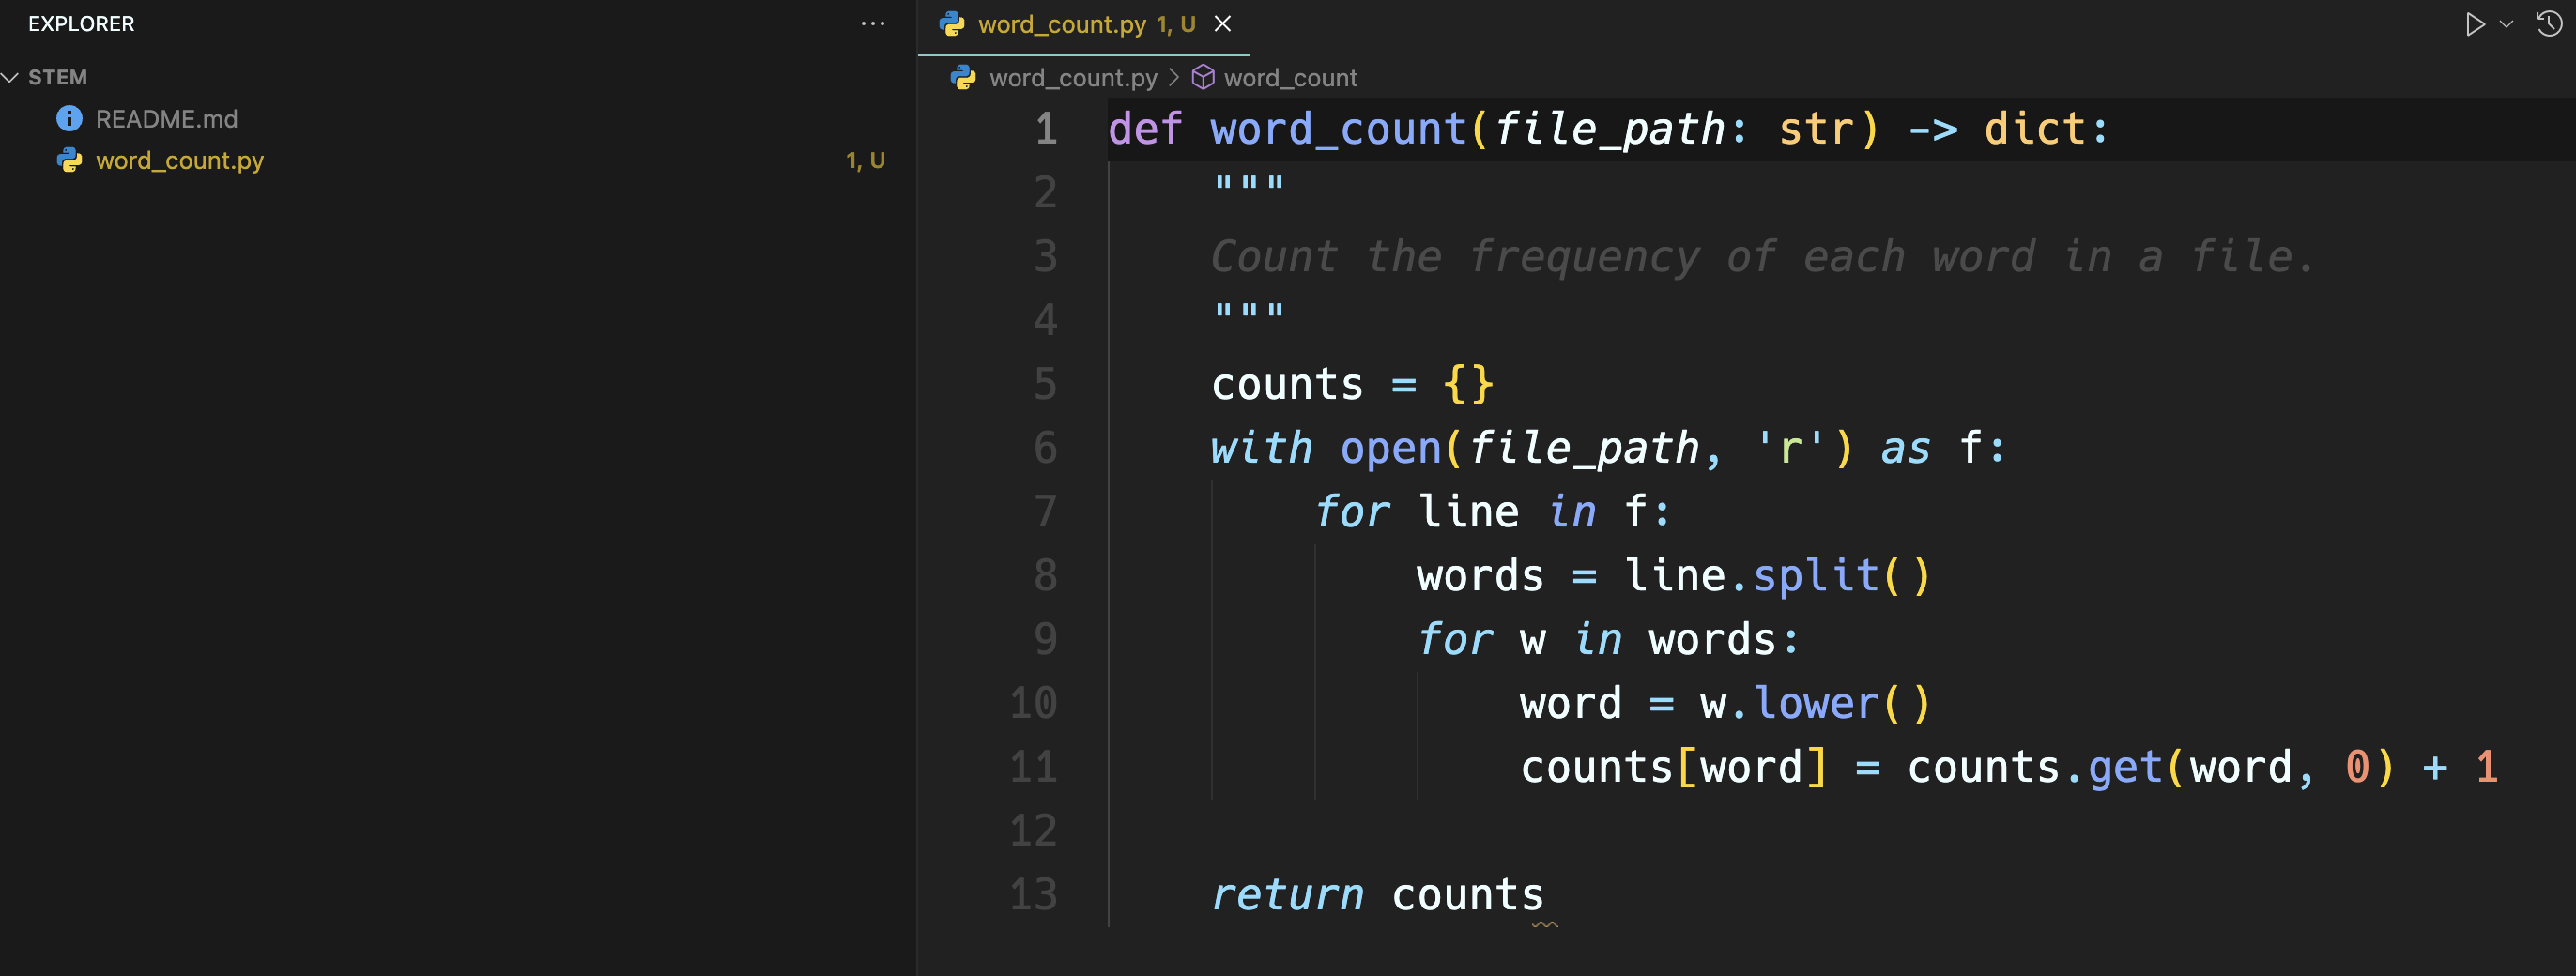
단어의 개수를 count하는 파이썬 코드를 하나 작성하고 commit 합니다.
def word_count(file_path: str) -> dict:
    """
    Count the frequency of each word in a file.
    """
    counts = {}
    with open(file_path, 'r') as f:
        for line in f:
            words = line.split()
            for w in words:
                word = w.lower()
                counts[word] = counts.get(word, 0) + 1

    return counts
git add .
git commit -m "feat: word_count.py 추가"
다음으로 push를 합니다.
git push origin feature
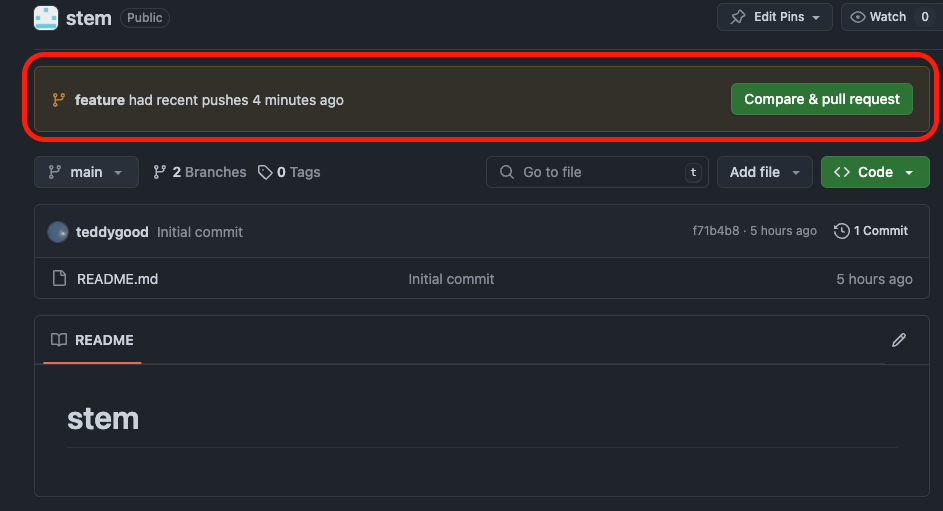
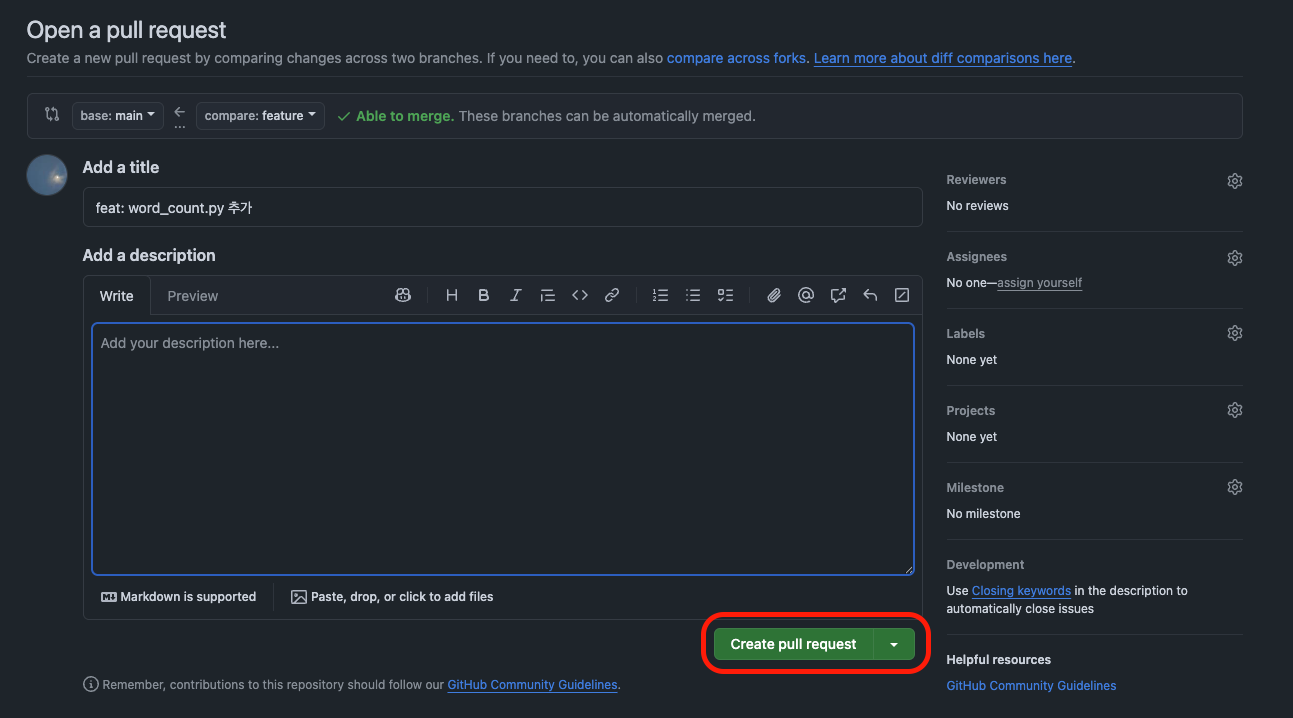
이제 다시 GitHub으로 돌아가면 아래와 같은 버튼이 생겼을 것입니다. 클릭 후 다음 페이지에서 Create pull request를 클릭합니다.
조금 시간이 지나면 아래와 같이 PR comment에 리뷰가 작성된 걸 확인할 수 있습니다.
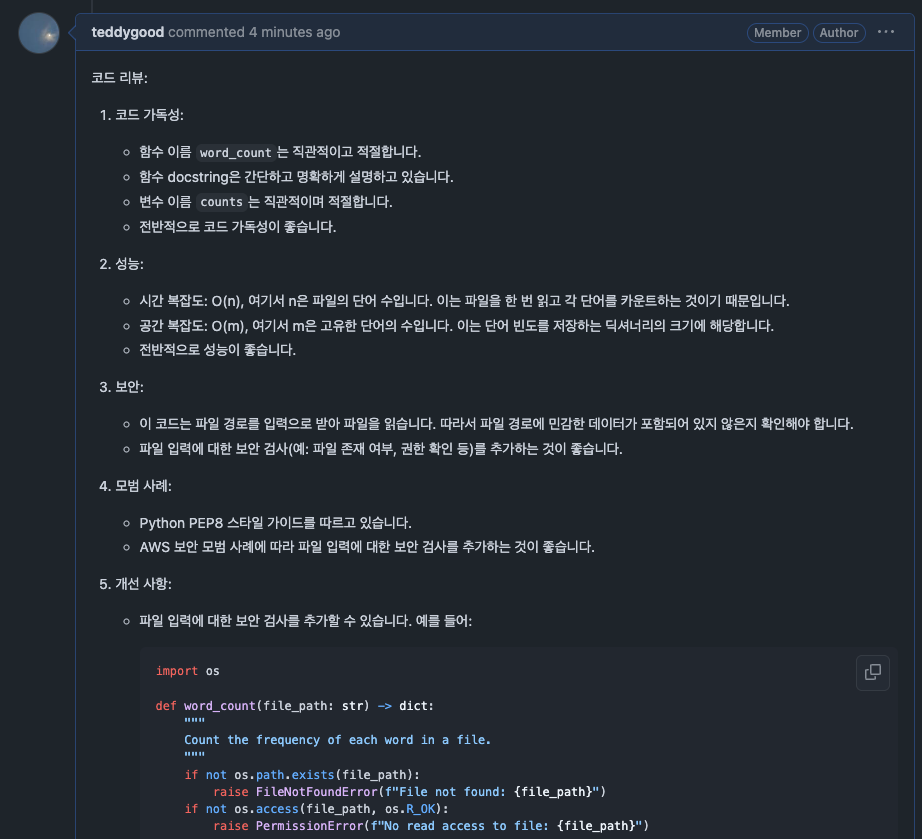
문자도 잘 오는 걸 확인할 수 있습니다.